Tinypropshop
A Helpful Guide tо Newborn Photography Studіо Lighting
Newborn Photography Studіо Lighting
Key points at a glance
Bringing a new life into the world is one of the most life-changing moments. It throws you into a state of happiness but also a state of panic. You are in a frenzy as you try to cater to the baby’s most basic needs. It seems almost like an endless series of chores and decisions. Yet, these moments are only fleeting. In no time, the little bundle of joy is no longer an infant.
Many parents want to capture these precious moments for posterity. After all, life is all about memories, and these beautiful fleeting moments create a part of your life’s kaleidoscope of memories and experiences. A professional newborn baby photographer can capture these moments and do it with such detail and nuance that all the sweet details of the newborn baby are meticulously brought out in the photos.
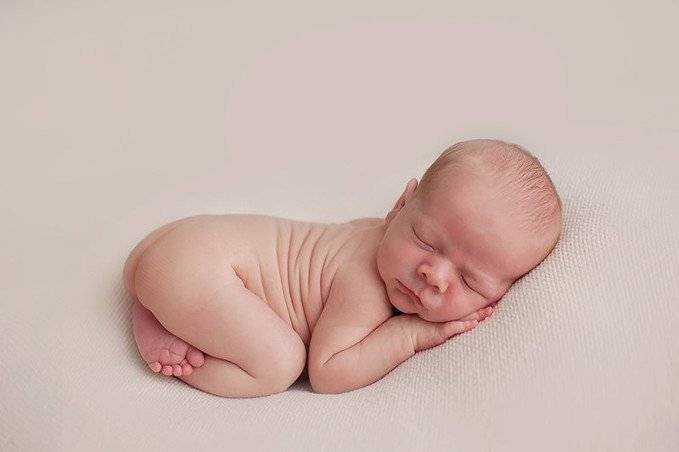
The best photo studios for newborns go out of their way to equip their setups with the right equipment for the perfect shot. There is a method to newborn photography in the studio. Newborns are a force and a law unto themselves. You have to delicately pose them in the studio lighting and get them to stay calm for the shot. Some prefer posing them while they are asleep.
The secret to getting the best shots in the baby photo studio is the lighting. There are a number of tips that you can follow for optimal lighting that will give you clear and beautiful shots.
Pose the baby the right way
Every newborn photographer has a unique style when it comes to posing the baby correctly. Posing the baby has its advantages from a lighting standpoint- the baby is perfectly lit. Posing also generates a curve in the photo. The human eye likes to see a C-shape or curve, and it’s able to see the photo as perfectly in harmony with the other details in the picture. A C-shaped or a curved baby pose is pleasing to both the eye and the brain.
The C pose entails posing the baby’s little body in a natural position utilizing his or her natural curves. Both the head and the body should be curved with the baby’s elbows placed beneath its knees. Ensuring the baby’s face should also be visible.
The most critical detail, obviously in the baby’s photo, is their face. You can only achieve this with a professional posing technique at a newborn photography studio.
Creating the visual layers
You can use a combination of lighting and posing to create visual layers in the picture.
One baby photography technique that gives excellent results in the studio involves creating visual layers in the photography by using a combination of lighting and posing.
Tiny Prop Wrap Options


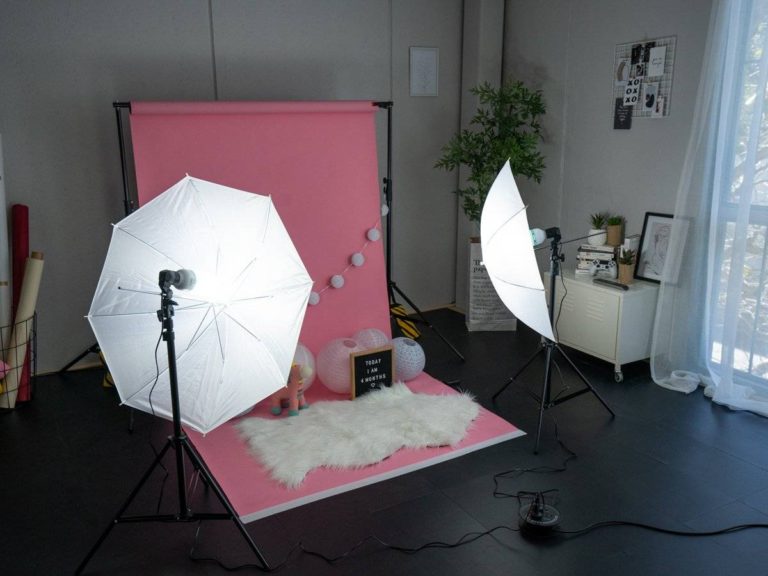
The Lighting Setup
The studio lighting setup is undoubtedly the most important part of the newborn baby photography. Based on the studio lighting fixtures that you purchase for newborn baby photos, it is possible to manipulate the lighting to get the desired look in the photograph.
The common lighting techniques used in newborn baby photography include the following:
- Rembrandt Lighting
- Broad Light and Short Light
- Back lighting
- Soft Lighting
- Rembrandt Lighting
Rembrandt lighting refers to a lighting technique where the newborn is lit from above from a 90-degree angle. This creates a mildly dramatic photo where one side of the face is well lit with the other side of the face being lit partially. The end result is a “triangle of light” on the newborn’s cheek, with light falling on the cheek that is partially lit.
Broad Light and Short Light
It is a common technique when it comes to newborn studio photography. In full lighting, most of the newborn baby will be illuminated by the light source. In short lighting, most of the newborn’s body will be in the shadows. For example, if you want to focus on the newborn’s face and turns it toward the light source, most of it will be well lit in the broad lighting technique. If most of the newborn’s face is in the shadows; however, then this is a short lighting technique.

Back lighting
In back lighting, both the camera and the cameraman are opposite the light source. The direction where the newborn photo is being taken from has shadows while facing the light source. The end product is a photo with smooth, creamy lighting.